How to use tricolor LED module with Arduino

  • avatar
  • 2.7K Views
  • 3 Likes
  • 4 mins read
Preview post image

The KY-016 is capable of producing wide range of different colors by mixing blue, green and red lights. The RGB LED module will not require any limiting resistors. Those resistors are already integrated in the circuit, and so 5V can be directly used as power input.

How to use an analog module with Arduino

  • avatar
  • 2.9K Views
  • 1 Like
  • 4 mins read
Preview post image

The KY-023 is an easy-to-use analog joystick. The joystick uses a biaxial potentiometer to control the X and Y axis. It also has an integrated push button. In this tutorial, it is shown how to connect the KY-023 joystick with the Arduino and how to use it.

How to use potentiometer with Arduino

  • avatar
  • 4.8K Views
  • 3 Likes
  • 4 mins read
Preview post image

A potentiometer is a simple knob that provides a variable resistance, which we can read into the Arduino board as an analog value. They can be attuned from zero ohms to whatever maximum resistance that is specific to it. For example, a potentiometer of 10 kΩ can be adjusted from 0 Ω to its maximum of 10 kΩ.

 Join Our Monthly Newsletter

Get the latest news and popular articles to your inbox every month

We never send SPAM nor unsolicited emails

Using push buttons with Arduino

  • avatar
  • 3.1K Views
  • 1 Like
  • 4 mins read
Preview post image

Today we are going to speak about push buttons, the wiring and how to implement the code for this circuit elements in Arduino. Push buttons connect two points in a circuit when you press them. That means that logic state of the circuit change when you press and keep pressed the button.

Pull-up and Pull-down resistors

  • avatar
  • 2.5K Views
  • 4 mins read
Preview post image

A resistor is a passive two-terminal electrical component that implements electrical resistance as a circuit element. In electronic circuits, resistors are used to reduce current flow and adjust signal levels among other uses. Resistance is measured in Ohm with a sign of Ω.

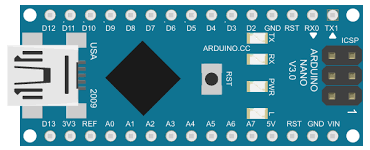
A microcontroller (e.g. Arduino) utilizes I/O signals for communication with external hardware devices, where the most commonly known being GPIO. As a reminder, digital logic circuits have three logic states: high, low and floating (or high impedance). When there’s nothing connected to your GPIO pins, your program will read a floating impedance state, which we do not want. To achieve either high or low states, we’ll have to implement pull-up or pull-down resistors in our digital circuit.

How to use the NRF24L01 module with Arduino

  • avatar
Preview post image

Having two or more Arduino boards be able to communicate with each other wirelessly over a distance opens lots of possibilities like remotely monitoring sensor data, controlling robots, home automation and the list goes on. A good, reliable and inexpensive solution is NRF24L01.

The NRF24L01+ is a newer version of the NRF24L01, capable of doing an extra 250kbps of on-air data rate while the one without “+” has only 1Mbps and 2Mbps. Both versions can be mixed together as long as 1 or 2 MBps is being used as the data rate.

Getting started with Arduino Nano

  • avatar
  • 3.0K Views
  • 5 mins read
Preview post image

Arduino is an open-source electronics platform based on easy-to-use hardware and software. Arduino boards are able to read inputs - light on a sensor, a finger on a button, or a Twitter message - and turn it into an output - activating a motor, turning on an LED, publishing something online. You can tell your board what to do by sending a set of instructions to the microcontroller on the board. To do so you use the Arduino programming language and the Arduino Software (IDE).