Pressure and temperature measurement with GY-65
Precision monitoring of atmospheric conditions becomes a reality with the GY-65 module based on BMP085 sensor. Armed with the ability to measure temperature, pressure, and altitude, the GY-65 module opens up a world of possibilities for weather stations, altitude tracking devices, and other projects requiring accurate environmental data. In this article, we delve into the capabilities of the module, examining its features, connectivity with Arduino.
Components
| 1x Arduino Nano (or another Arduino module) $3.38 |
| 1x Mini-breadboard
|
| 1x GY-65 module $0.98 |
| Dupont wires
|
| BMP085 official library |
Wiring schema
The connection to the controller is established using the I2C (Inter-Integrated Circuit) interface, which is a widely used serial communication protocol. The I2C interface consists of two lines: SDA (Serial Data Line) and SCL (Serial Clock Line). In the case of the Arduino Nano, the SDA (Serial Data Line) and SCL (Serial Clock Line) pins, which correspond to the I2C interface, are designated as A4 and A5, respectively.
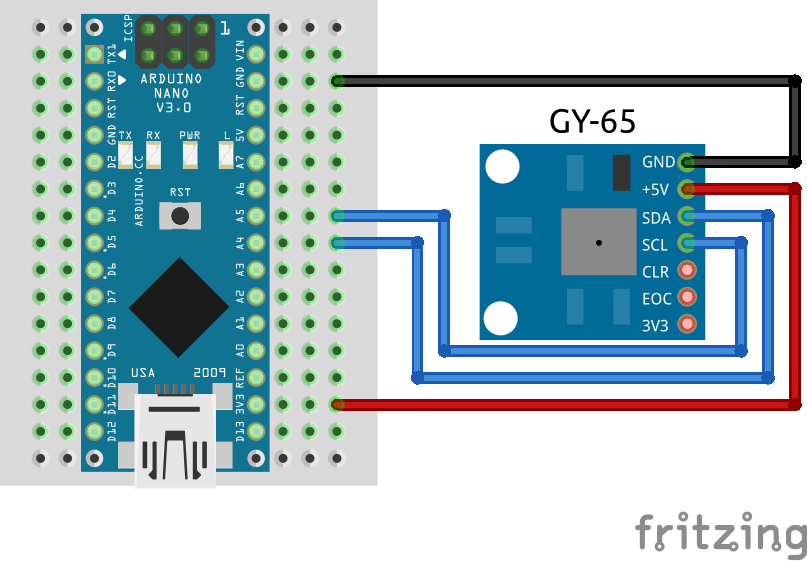
To establish the connection, the controller acts as the master device, while the connected device operates as the slave. The master device initiates communication by sending control signals on the SDA and SCL lines. The SCL line provides the clock signal that synchronizes the data transfer. Data transfer in I2C communication can occur in both directions, allowing for bi-directional communication between the controller and the connected device.
Install Adafruit library for BMP085
To interact with the BMP085 sensor, we will use the official Adafruit library. This library, provides an interface that facilitates communication with the module, saving you significant time and providing a reliable and extensively tested code base. It can be downloaded from our official repository.
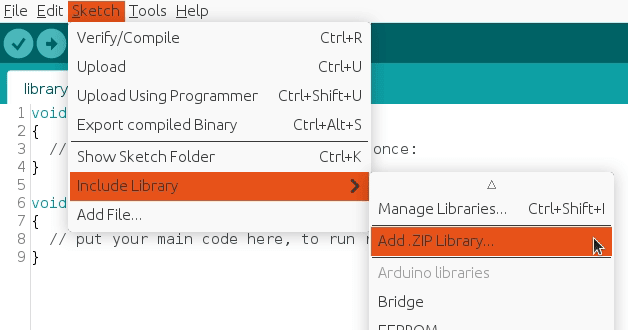
To import a library, open the Arduino IDE, go to Sketch > Include Library > Add .ZIP Library and select the library file downloaded from our GitHub repository.
Then you can simply use include statement:
#include "Adafruit_BMP085.h"
It will include the library with predefined functions to interact with the module.
Arduino code
Using the library makes the code much easier to understand.
#include "Wire.h"
#include "Adafruit_BMP085.h" // Adafruit BMP085 library

Adafruit_BMP085 bmp;

void setup()
{
  Serial.begin(115200);

  if (!bmp.begin()) {
    Serial.println("Sensor BMP085 not found, check the connections!");

    while (true);
  }
}

void loop()
{
  Serial.print("Temperature = ");
  Serial.print(bmp.readTemperature());
  Serial.print("\\xC2\\xB0"); //Print degree symbol
  Serial.print("C");
  Serial.println("");

  Serial.print("Pressure = ");
  Serial.print(bmp.readPressure());
  Serial.println(" Pa");

  // Calculate altitude assuming 'standard' barometric
  // pressure of 1013.25 millibar = 101325 Pascal
  Serial.print("Altitude = ");
  Serial.print(bmp.readAltitude());
  Serial.println(" meters");

  Serial.print("Pressure at sealevel (calculated) = ");
  Serial.print(bmp.readSealevelPressure());
  Serial.println(" Pa");

  // you can get a more precise measurement of altitude
  // if you know the current sea level pressure which will
  // vary with weather and such. If it is 1015 millibars
  // that is equal to 101500 Pascals.
  Serial.print("Real altitude = ");
  Serial.print(bmp.readAltitude(101500));
  Serial.println(" meters");

  Serial.println();
  delay(2000); // wait one second
}
Testing
The program is configured to produce output data at regular intervals of 2 seconds.
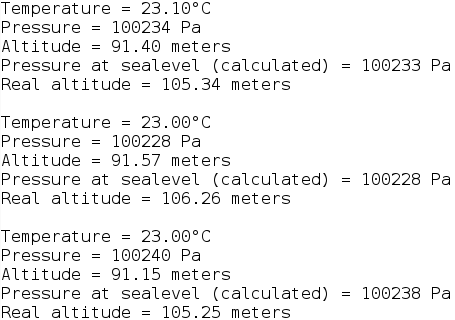
The serial monitor will display similar output that reflects your location and environmental conditions.
Credits
Official GitHub: https://github.com/hibit-dev/gy65
Official Adafruit GitHub: https://github.com/adafruit/Adafruit-BMP085-Library





0 Comments