Controlling fan speed with Arduino using a potentiometer
Adjusting a fan's speed using an Arduino is a great way to learn about PWM (Pulse Width Modulation) and motor control. With just a potentiometer and some simple wiring, you can create a smooth, manual speed adjustment system. This setup is useful for cooling electronics, ventilation projects, or any application where adjustable airflow is needed.
Prerequisites
Before you start, these two articles will help you understand the basics of PWM and potentiometers:
Components
| 1x Arduino Nano (or another Arduino module)
|
| 1x Mini-breadboard
|
| 1x 5V Fan
|
| 1x Potentiometer
|
| Dupont wires
|


How the system works
The fan is essentially a small DC motor with attached blades. Its speed is controlled by adjusting the voltage applied to it, but since the Arduino can't provide variable voltage directly, it uses PWM. PWM rapidly turns the power on and off, creating an average voltage that determines the fan's speed. The potentiometer acts as an adjustable resistor, allowing the Arduino to read its position and translate it into a PWM signal to control the fan.
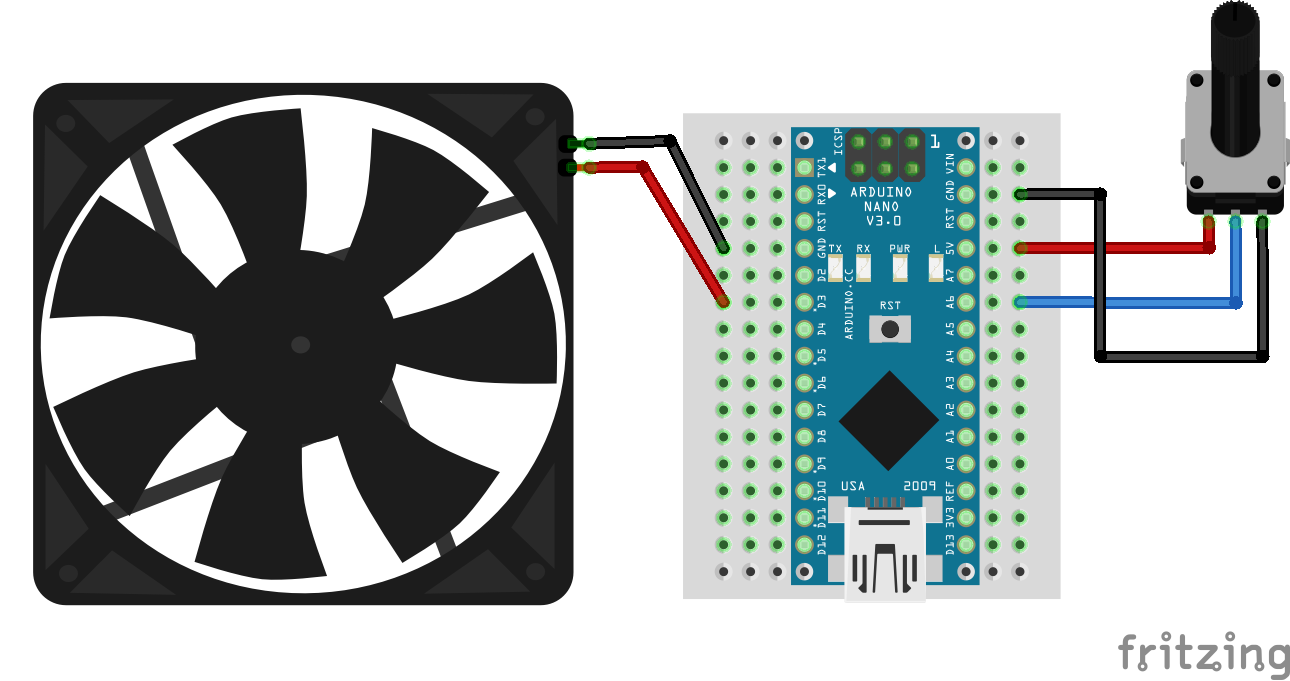
Wiring schema
Since the fan operates at 5V and does not draw much current, it can be powered directly from the Arduino. The Arduino generates a PWM signal that controls the fan's speed based on the position of the potentiometer. This makes the setup simple, efficient, and easy to modify for other small motor control applications.
If you were using a larger fan that requires more current than the Arduino can safely provide, you would need an external power supply and a transistor or MOSFET. The transistor acts as a switch, allowing the Arduino to control the fan without directly supplying the power. But since this project uses a low-power 5V fan, the direct connection to the Arduino is sufficient.
Arduino code
The following Arduino code allows the fan speed to be controlled by the position of a potentiometer. It reads the potentiometer's value, maps it to a range suitable for PWM, and then adjusts the fan speed accordingly.
#define POTENTIOMETER_PIN A6
#define FAN_PIN 3

struct potentiometer {
  byte level = 0;
};

potentiometer potentiometer;

void setup()
{
  pinMode(POTENTIOMETER_PIN, INPUT);
  pinMode(FAN_PIN, OUTPUT);

  Serial.begin(115200);
}

void loop()
{
  potentiometer.level = readPotentiometerLevelMapped(POTENTIOMETER_PIN);

  Serial.print("Potentiometer value [0-255]: ");
  Serial.println(potentiometer.level);

  setFanSpeed(potentiometer.level);
}

byte readPotentiometerLevelMapped(int pin)
{
  return map(analogRead(pin), 0, 1023, 0, 255);
}

void setFanSpeed(int speed)
{
  analogWrite(FAN_PIN, speed);
}
This code helps to control the fan speed dynamically based on the potentiometer's position, while also providing live feedback through the serial monitor for easy adjustments. The mapped potentiometer value (ranging from 0 to 255) is printed to the serial monitor, making it easier to debug and monitor the changes in the potentiometer position as it adjusts the fan speed.
Testing
After uploading the code, turn the potentiometer knob to adjust the speed. If the fan doesn’t start spinning at lower values, you can modify the map() function like this:
byte readPotentiometerLevelMapped(int pin)
{
  return map(analogRead(pin), 0, 1023, 50, 255);
}
This ensures the fan always gets a minimum speed of 50. Fine-tuning these values can improve performance based on your fan's characteristics.
Conclusion
Controlling a fan with an Arduino and a potentiometer is a simple way to experiment with PWM and motor speed control. This setup can be easily expanded with additional features like buttons, temperature sensors, or automated speed adjustments. It's a great starting point for more complex projects and a useful skill for building interactive electronic systems.
Credits
Official GitHub: https://github.com/hibit-dev/fan-control


0 Comments