schema


Understanding SIPO Shift Registers

  • avatar
  • 1.7K Views
  • 7 mins read
Preview post image

Shift registers are integral components in digital electronics, enabling efficient data management and transfer. When working on Arduino projects, you may quickly run into the issue of not having enough output pins to control all your components. This is where SIPO (Serial-In, Parallel-Out) shift registers come into play. These devices allow you to manage multiple outputs with just a few pins on your Arduino, making them a powerful tool for more complex projects involving numerous LEDs, buttons or other peripherals. This article explores why shift registers are necessary, how they function, and their practical applications with Arduino.

Controlling a LED with Arduino

  • avatar
  • 2.0K Views
  • 6 mins read
Preview post image

Light Emitting Diodes (LEDs) are incredibly adaptable components often employed in electronics projects for various purposes, from indicating status to creating captivating lighting effects. When it comes to managing LEDs with an Arduino, you have the option of utilizing either digital pins or Pulse Width Modulation (PWM) pins. In this article, we'll explore the advantages of each method and provide you with a comprehensive guide on how to control LEDs using an Arduino.

Using switch buttons with Arduino

  • avatar
  • 2.5K Views
  • 3 Likes
  • 4 mins read
Preview post image

Let's speak now about switch buttons, the wiring and how to implement the code for this circuit elements in Arduino. Switch buttons connect two points in a circuit when you press them and maintain the state without the need to keep the button pressed. That means that logic state of the circuit change every time you press the button.

 Join Our Monthly Newsletter

Get the latest news and popular articles to your inbox every month

We never send SPAM nor unsolicited emails

Using touch sensor with Arduino

  • avatar
  • 2.3K Views
  • 4 mins read
Preview post image

Touch sensor (also known as touch button) is widely used to control devices. It detects touch, force or pressure on its surface changing the logic state of the circuit. Actually, it works in very similar way as to buttons. Checkout the wiring and Arduino code implementation to track the current state and the state changes.

Connecting a motor to Arduino

  • avatar
  • 1.9K Views
  • 1 Like
  • 7 mins read
Preview post image

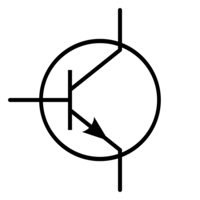
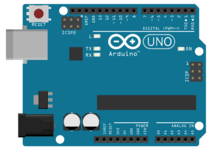
Arduino microcontrollers are the heart of countless DIY projects, from robots to automated systems. To bring these projects to life, you often need to interface them with motors. In this guide, we'll walk you through the essential steps of connecting a motor to an Arduino using a separate power supply while ensuring control with precision using an NPN transistor. This approach allows you to harness the full potential of your motorized creations without overloading your Arduino.

Practical guide to ESP8266 for TCP servers and clients

Available to registered members only
  • avatar
  • 1.6K Views
  • 1 Like
  • 17 mins read
Preview post image

The ESP8266 module has become a favorite among electronics enthusiasts for its low cost and powerful capabilities. This Wi-Fi module can be used in various ways, making it a versatile tool for many IoT applications. In this guide, we will explore how the ESP8266 can function as both a server and a client using TCP protocol.

Pull-up and Pull-down resistors

  • avatar
  • 2.5K Views
  • 4 mins read
Preview post image

A resistor is a passive two-terminal electrical component that implements electrical resistance as a circuit element. In electronic circuits, resistors are used to reduce current flow and adjust signal levels among other uses. Resistance is measured in Ohm with a sign of Ω.

A microcontroller (e.g. Arduino) utilizes I/O signals for communication with external hardware devices, where the most commonly known being GPIO. As a reminder, digital logic circuits have three logic states: high, low and floating (or high impedance). When there’s nothing connected to your GPIO pins, your program will read a floating impedance state, which we do not want. To achieve either high or low states, we’ll have to implement pull-up or pull-down resistors in our digital circuit.

Practical guide to ESP8266 for UDP servers and clients

Available to registered members only
  • avatar
  • 1.4K Views
  • 1 Like
  • 15 mins read
Preview post image

The ESP8266 module has become a favorite among electronics enthusiasts for its low cost and powerful capabilities. This Wi-Fi module can be used in various ways, making it a versatile tool for many IoT applications. In this guide, we will explore how the ESP8266 can function as both a server and a client using UDP protocol.

Getting started with Arduino Uno

  • avatar
  • 1.9K Views
  • 1 Like
  • 5 mins read
Preview post image

Arduino is an open-source electronics platform based on easy-to-use hardware and software. Arduino boards are able to read inputs - light on a sensor, a finger on a button, or a Twitter message - and turn it into an output - activating a motor, turning on an LED, publishing something online. You can tell your board what to do by sending a set of instructions to the microcontroller on the board. To do so you use the Arduino programming language and the Arduino Software (IDE).

Play The Simpsons theme song with Arduino and a buzzer

Available to registered members only
  • avatar
  • 1.3K Views
  • 1 Like
  • 5 mins read
Preview post image

The Simpsons, that legendary animated series we all know and love, has become a cultural phenomenon. With its hilarious take on family life in Springfield, it's an absolute classic. We decided to have a bit of fun and recreate the show's iconic theme song using a piezo buzzer.

Buzzer is used to generate sound, beep or even melody of a song. It can be found in alarm devices, computers, timers and confirmation of user input such as a mouse click or keystroke. A piezo buzzer is not like a regular speaker that you might think of. It uses a material that actually changes shape when you apply electricity to it which in turn creates noise. The faster you bend the material, the higher the pitch of the noise that is produced.